Author Archives: David Mézière

Isolation du plateau : Avant / après

Isolation of the Alfawise U20 bed

I bought myself a first spool of ABS filament. But before trying it, I wanted to prepare my printer for it. ABS requires higher temperatures than PLA, both at the nozzle and bed levels, and ideally printer confinment. Here is my feedback on the bed isolation for ABS printing.

I decided this time to share with you the list of materials that I used in the form of Amazon links at the end of the article. If you are interested in the material I have used, you can order it by earning me a commission to support my blog. I have no idea how this system works, so it will be a discovery.

The interest

Let’s start at the end! What is the difference with the isolation of the board?

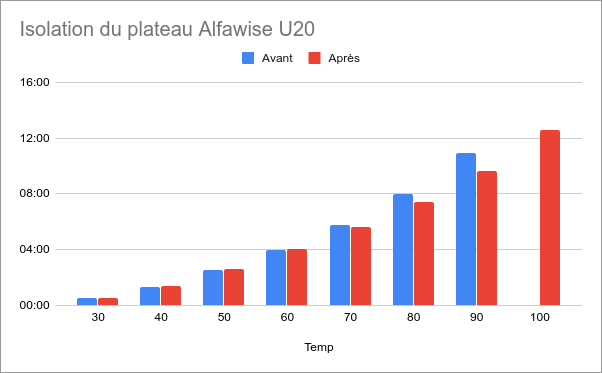
On this graph we can see that up to 60°C, it does not change much.

Temperature Before After
30°C 00:32 00:30
40°C 01:19 01:22
50°C 02:31 02:37
60°C 04:00 04:02
70°C 05:48 05:36
80°C 08:00 07:26
90°C 10:57 09:39
100°C 12:33

The figures even tell us that it is slightly worse! On the other hand, past 60°C, an isolated bed begins to save you heating time, and therefore energy. This also applies during printing, to maintaining the temperature. The initial temperatures were 20°C when I tested without isolation, and 21°C when I tested with it. The Alfawise U20’s thermostat goes up to 100°C. During my test without insulation, I thought that the temperature actually leveled out at 90°C because the measured temperature oscillated between 89°C and 90°C without ever exceeding 90°C. The insulation test proved me wrong.

If I sum up, isolating your tray is of little use if you only want to print in PLA, because you will not exceed 60°C. Your printer will then (very slightly) consume more energy and will (very slightly) take longer to warm up before printing. On the other hand, maintaining the temperature should be more economical throughout the printing (not measured). In addition, if you read the article to the end, you will understand that your plate will be (always very slightly) heavier, and will risk hitting the Y-axis motor if you miss it.

On the other hand, if you want to print in ABS, isolating your plate will allow you to exceed 90°C, to gain (very slightly) in heating time and in energy saving, both in pre-heating and during printing.

Installation

This is not a tutorial, but a sharing of experience. I do not pose as an expert, far from it, but I got out, and rather not bad, I think.

I started by putting the glass tray aside, in a safe place, and being careful not to put my big dirty fingers on it.

I positioned the foam on the back of the tray and held it in place with the pliers to mark the locations of the screw holes on the cardboard.

Marquage des emplacements de trous

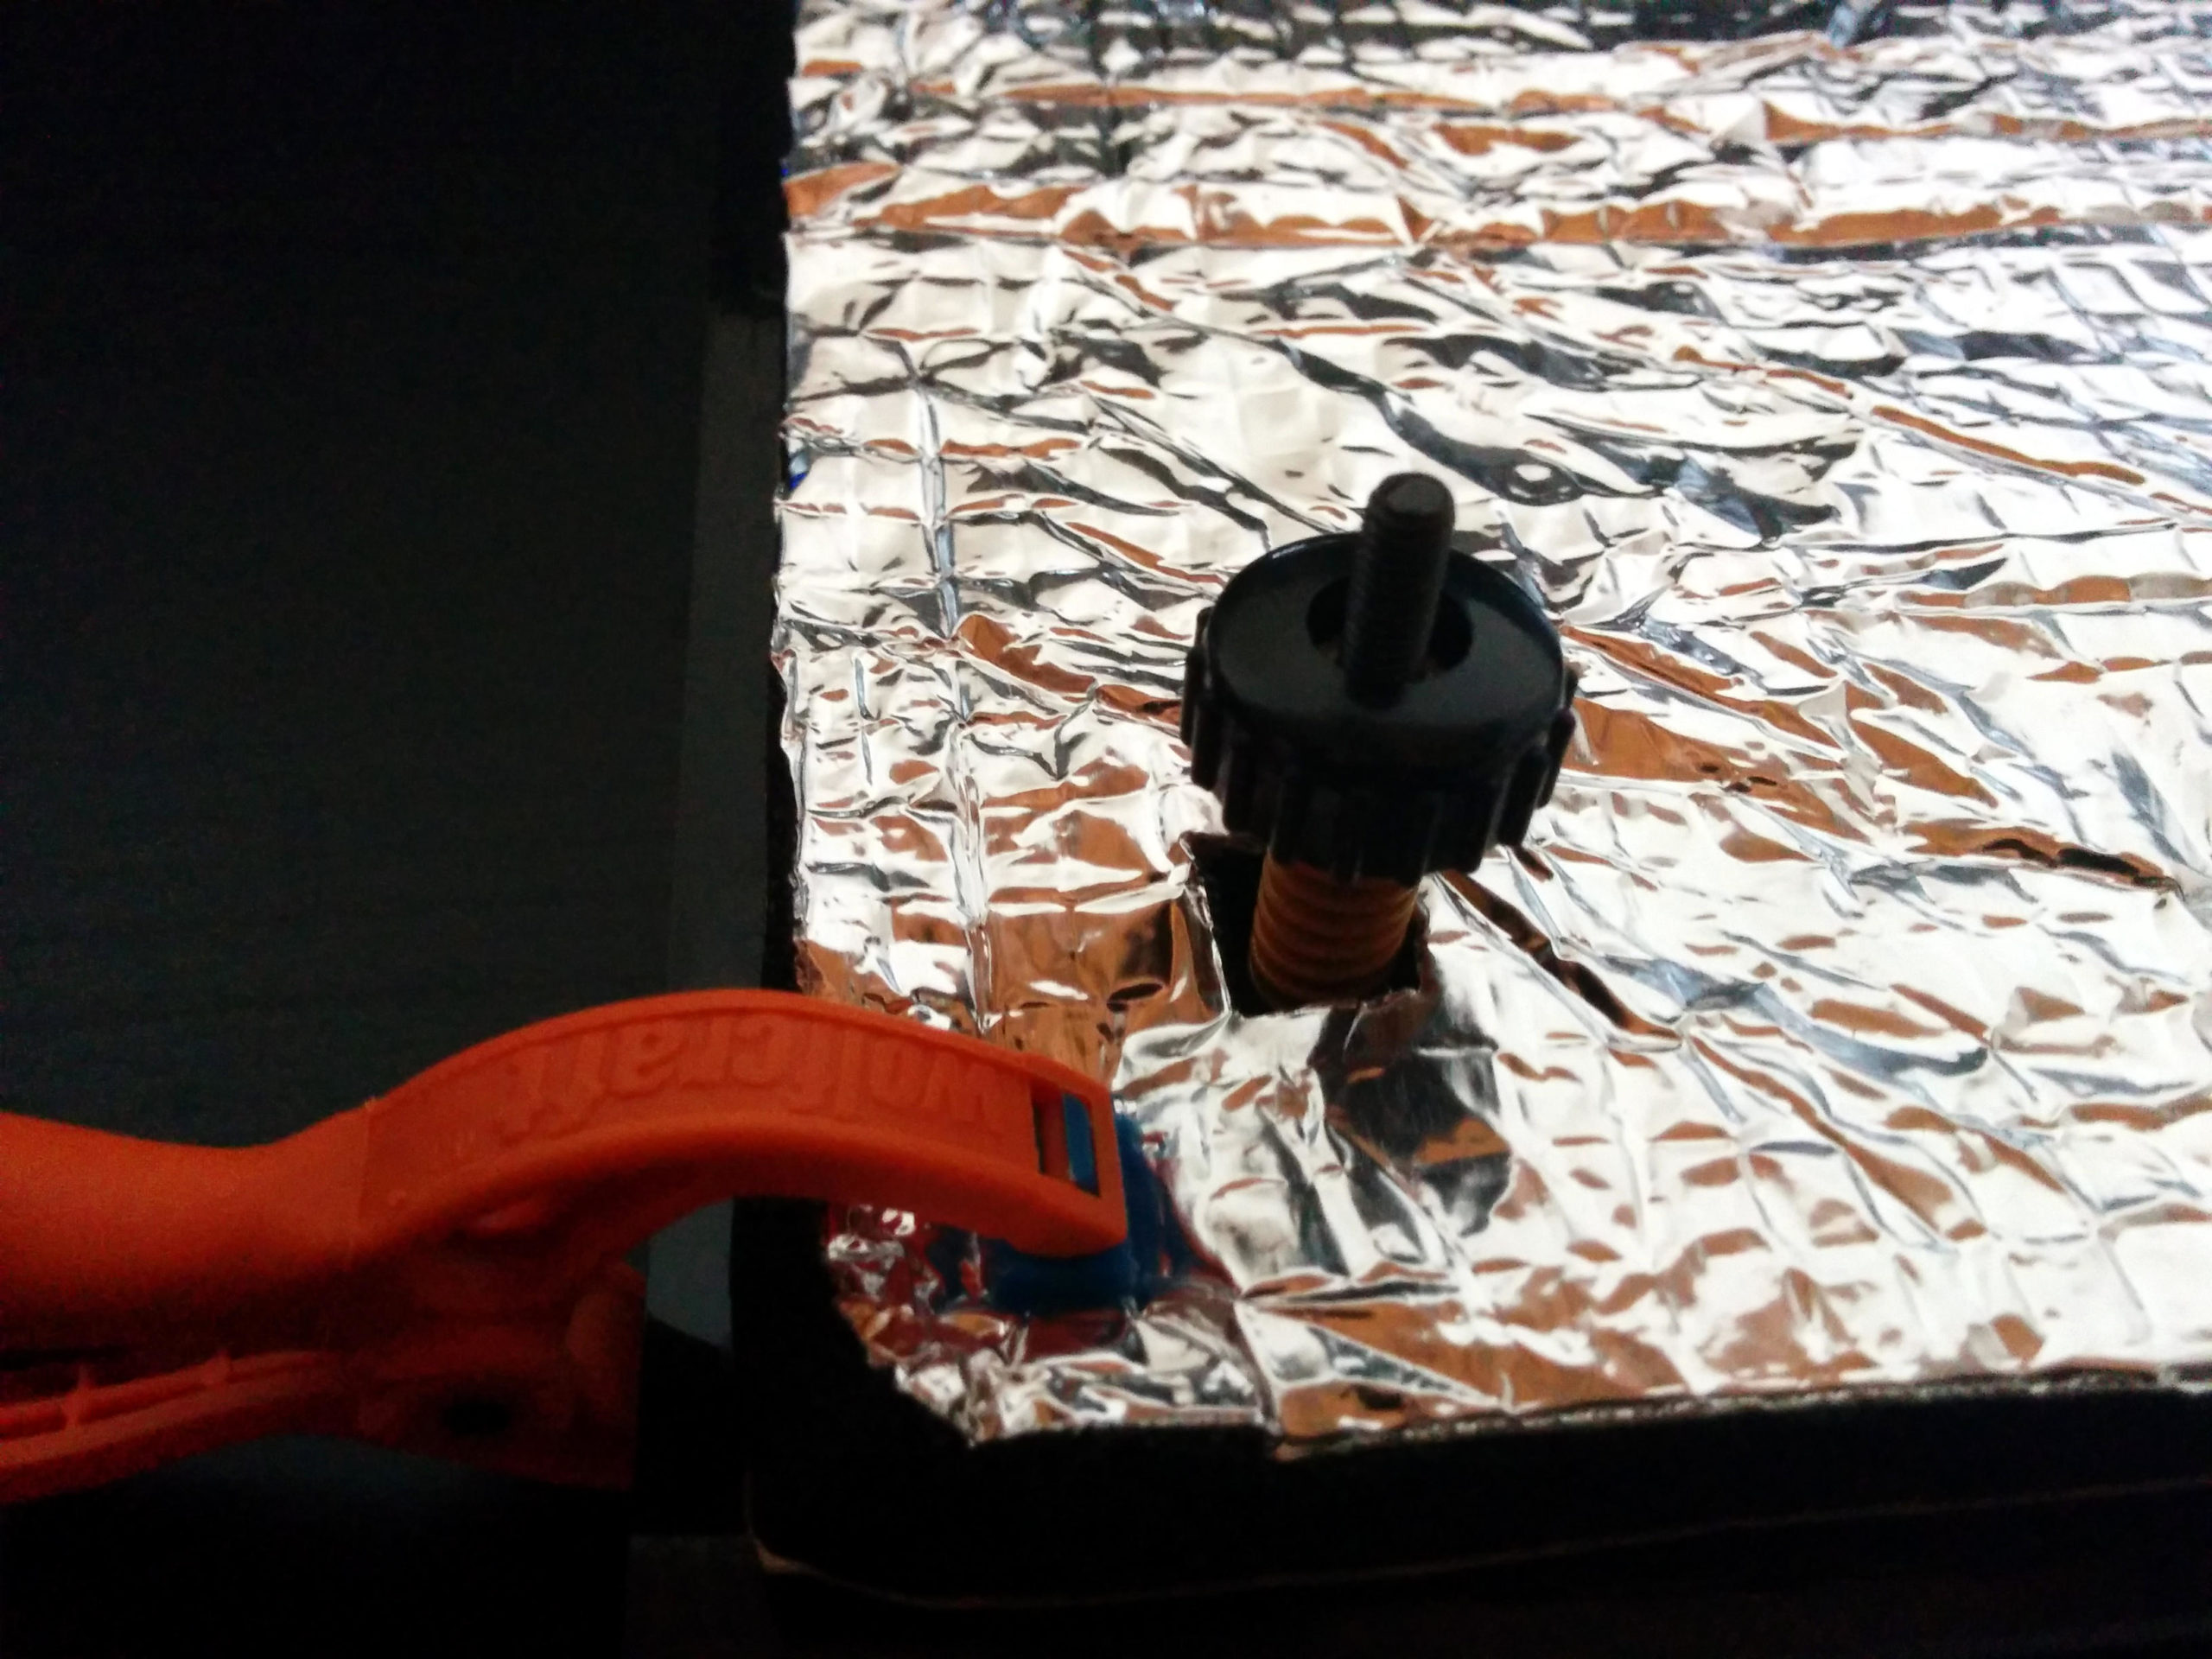
I used a small straight blade mounted on the exacto-knife to make holes a little larger than those of the screws in order to pass the spring without it touching the foam too much.

Perçage des trous

Before gluing, I set up, maintained with the pliers, and I installed the screw / spring / wheel assemblies, to validate everything.

Validation avant collage

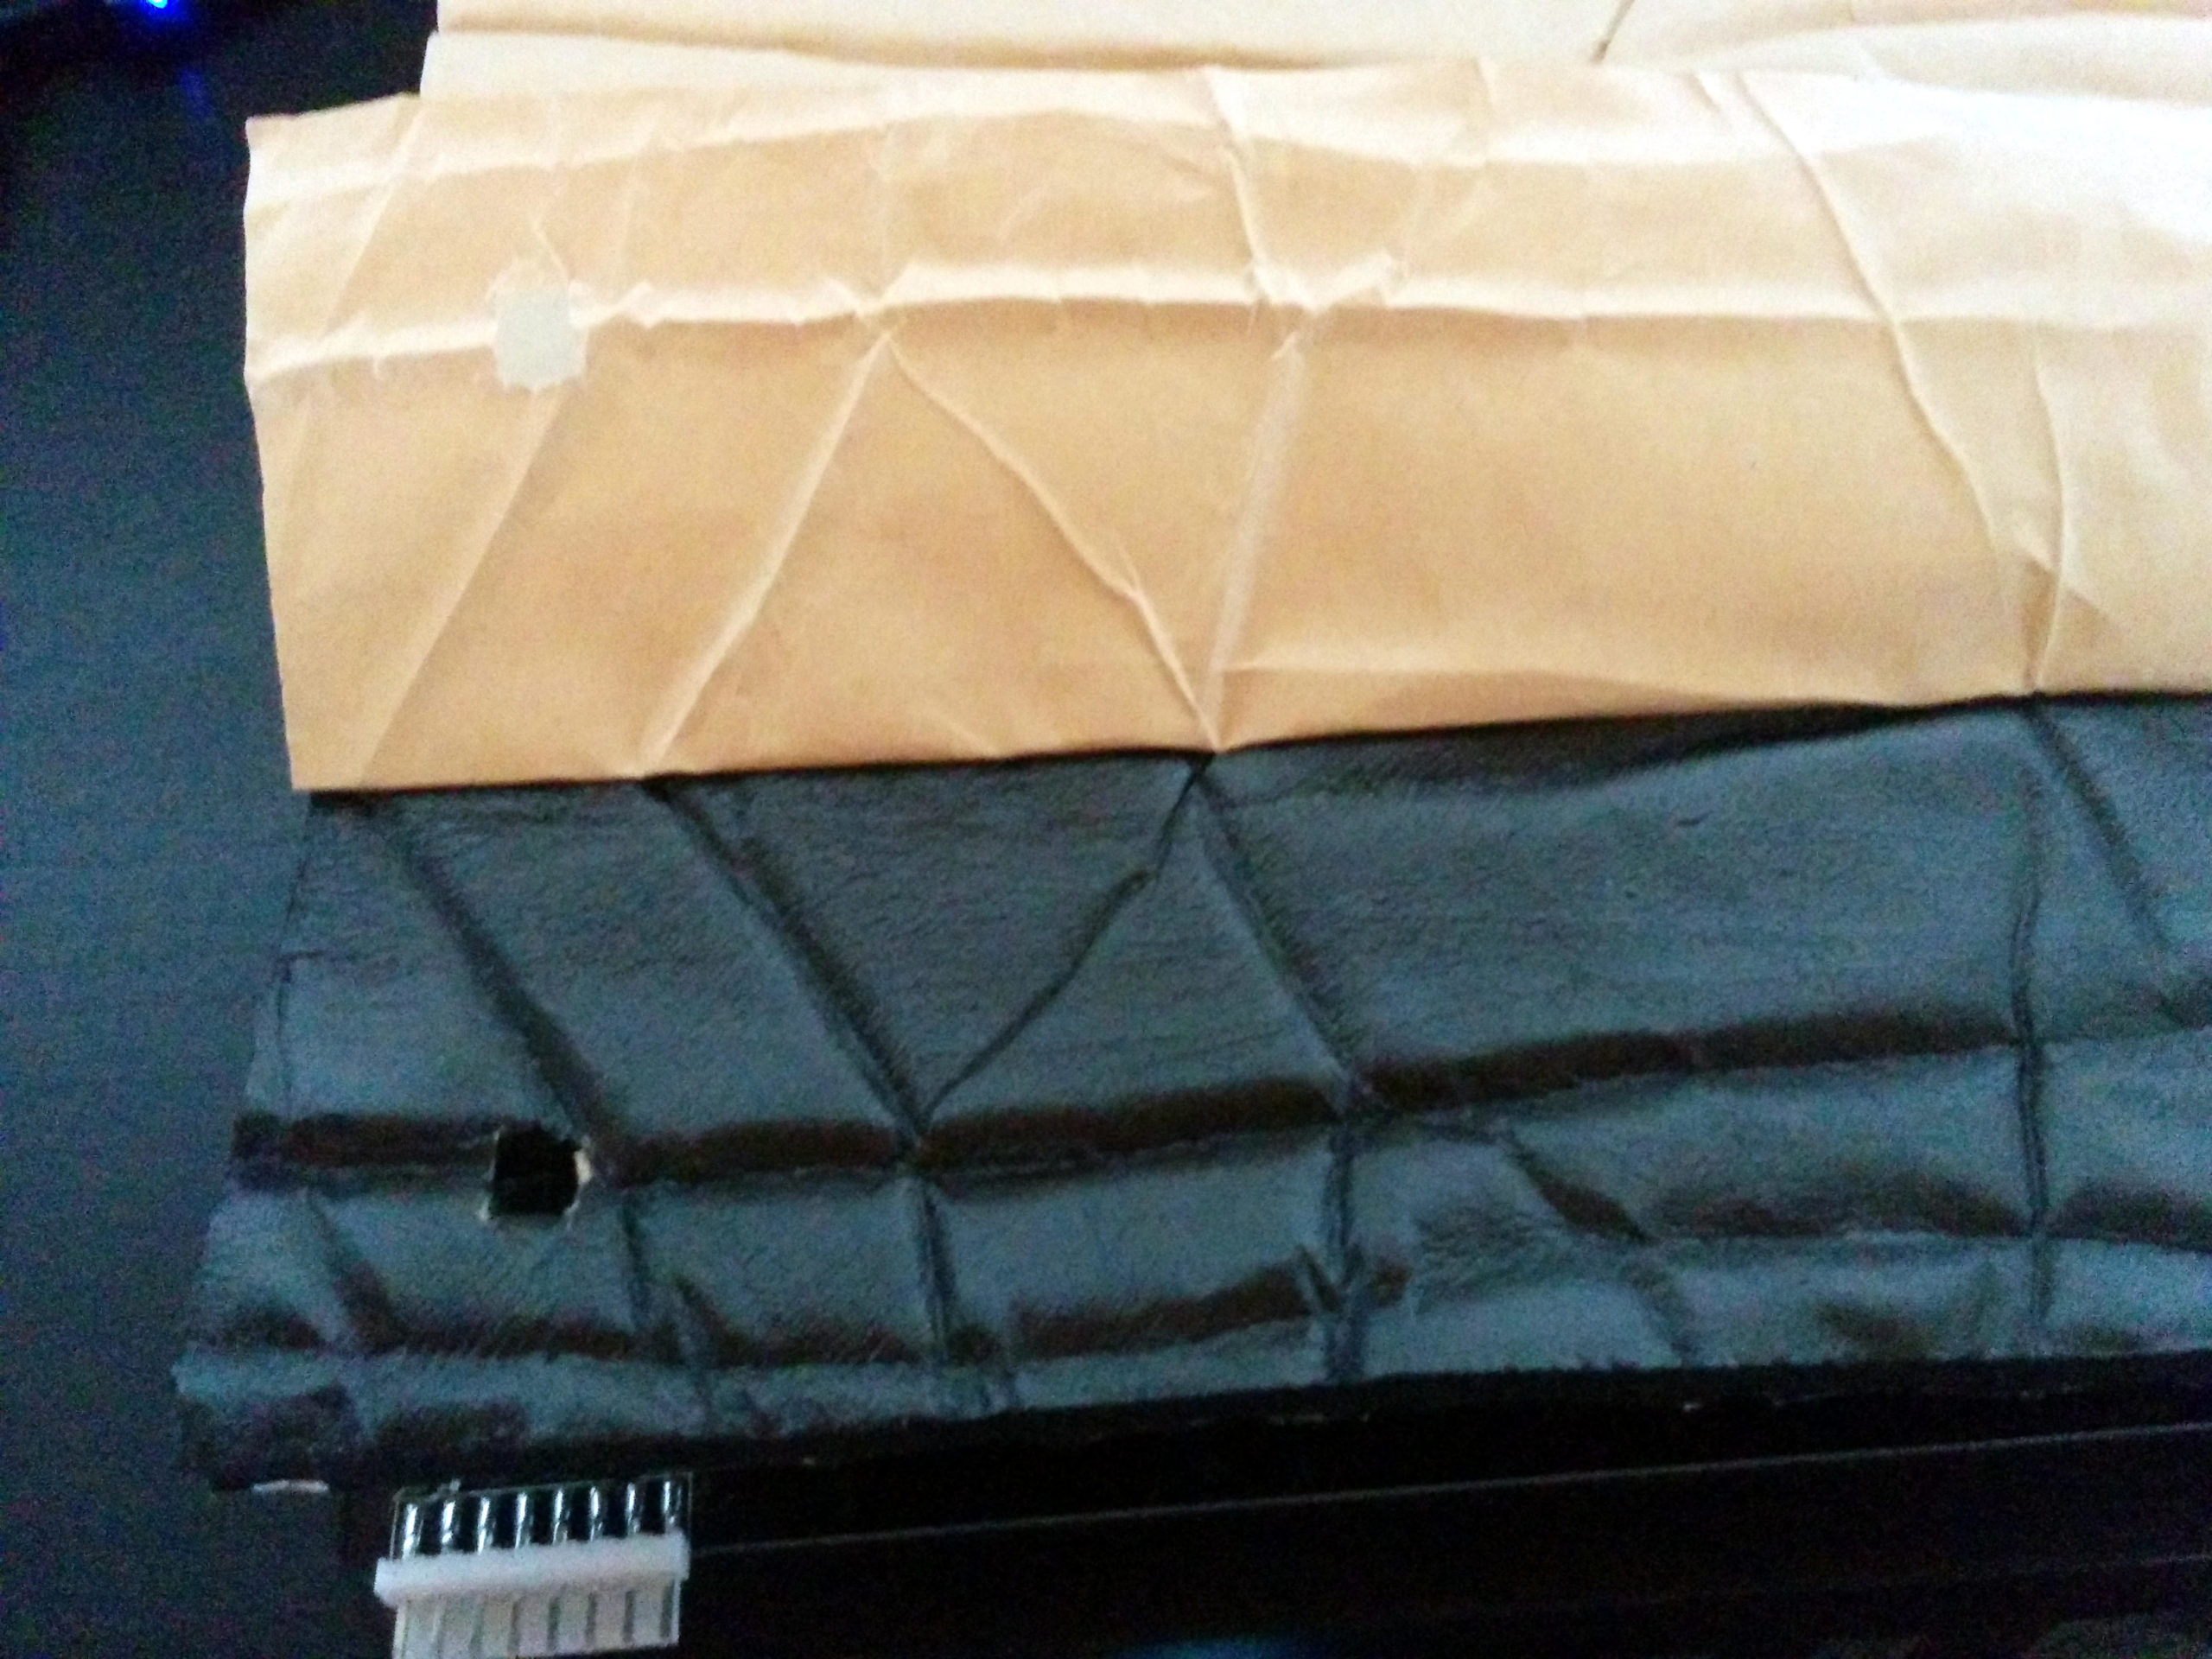
I removed the cardboard strip by strip to ease the installation of the foam. If you remove all the cardboard, the foam will stick wherever it can, it complicates enormously.

Collage de l'isolant

Once the foam had been glued, I let it cure for 24 hours with a little weight on the tray, placed on a flat surface. The next day, I put the bed back on the printer. I put it in the lowest possible position, then I carefully lowered the print head to zero Z, taking care not to touch the plate.

I finally made a leveling of the plate, in two stages (first at 1mm from the head, then conventionally, with a thickness of sheet of paper. It was then that the drama occurred 🙂

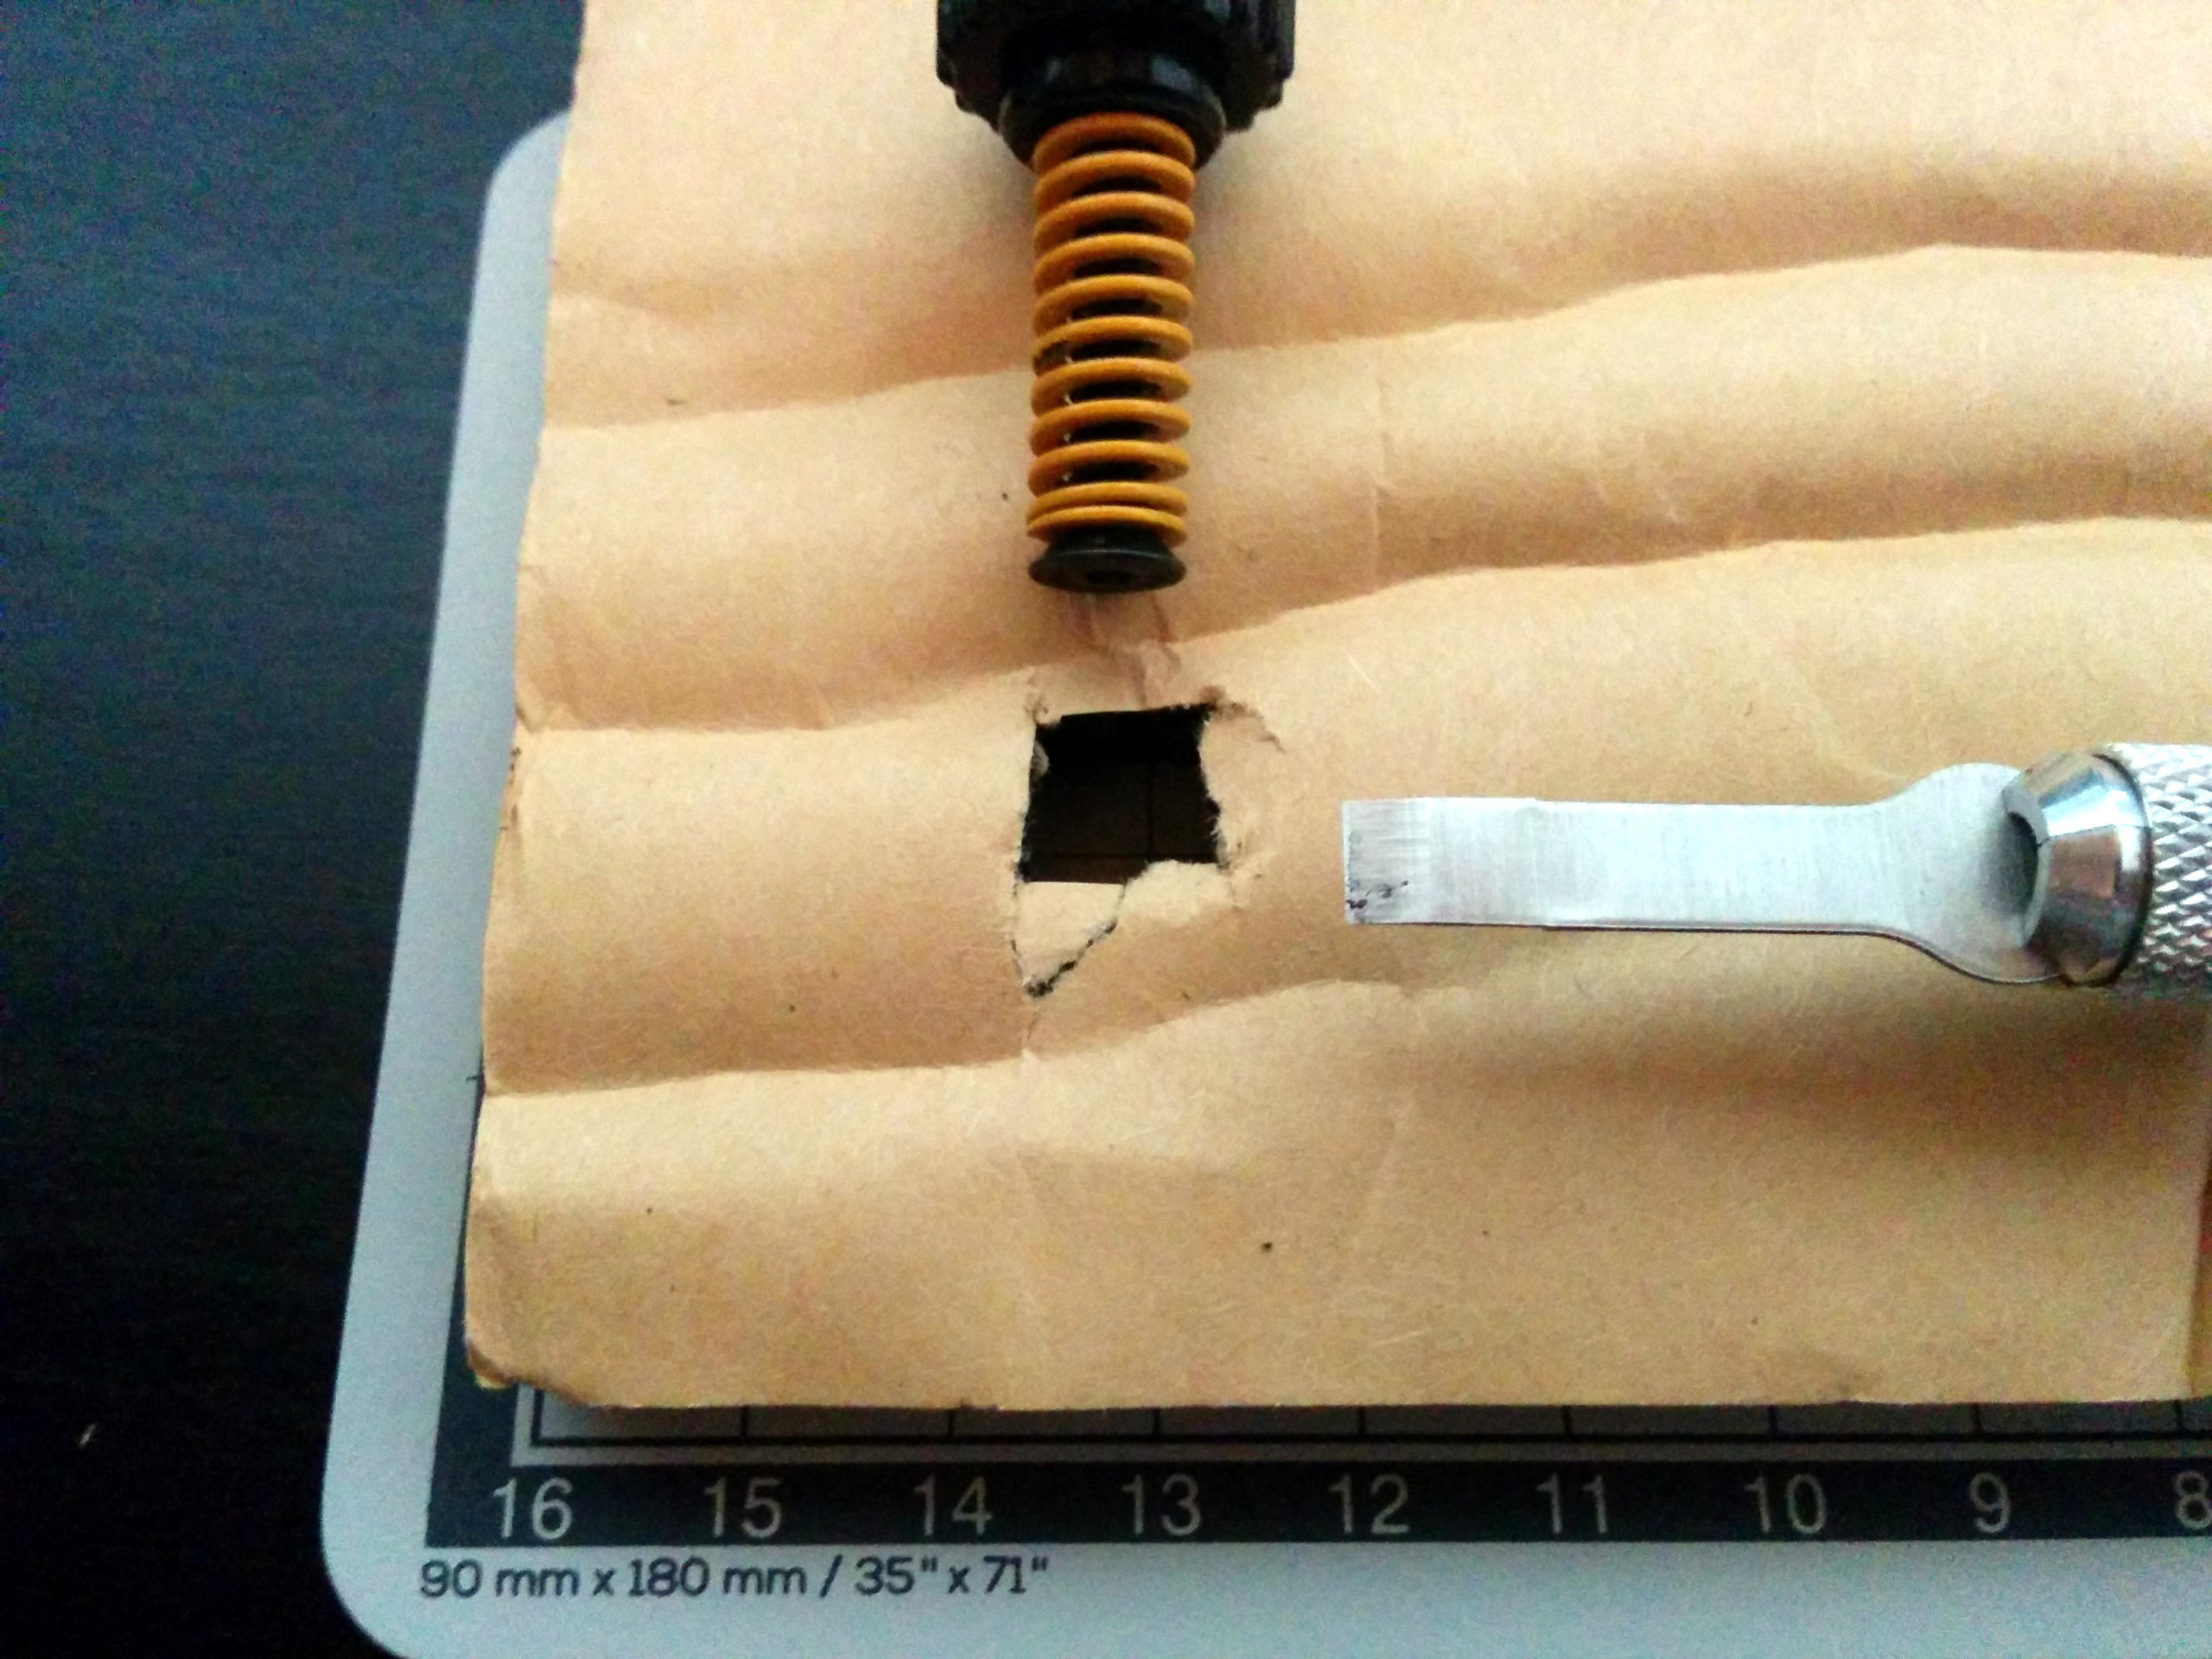
At the first homing of the Y axis, the engine could no longer pass under the plate, as expected. The foam prevented it. I immediately turned off the printer when I heard the characteristic noise of the axis being prevented from turning.

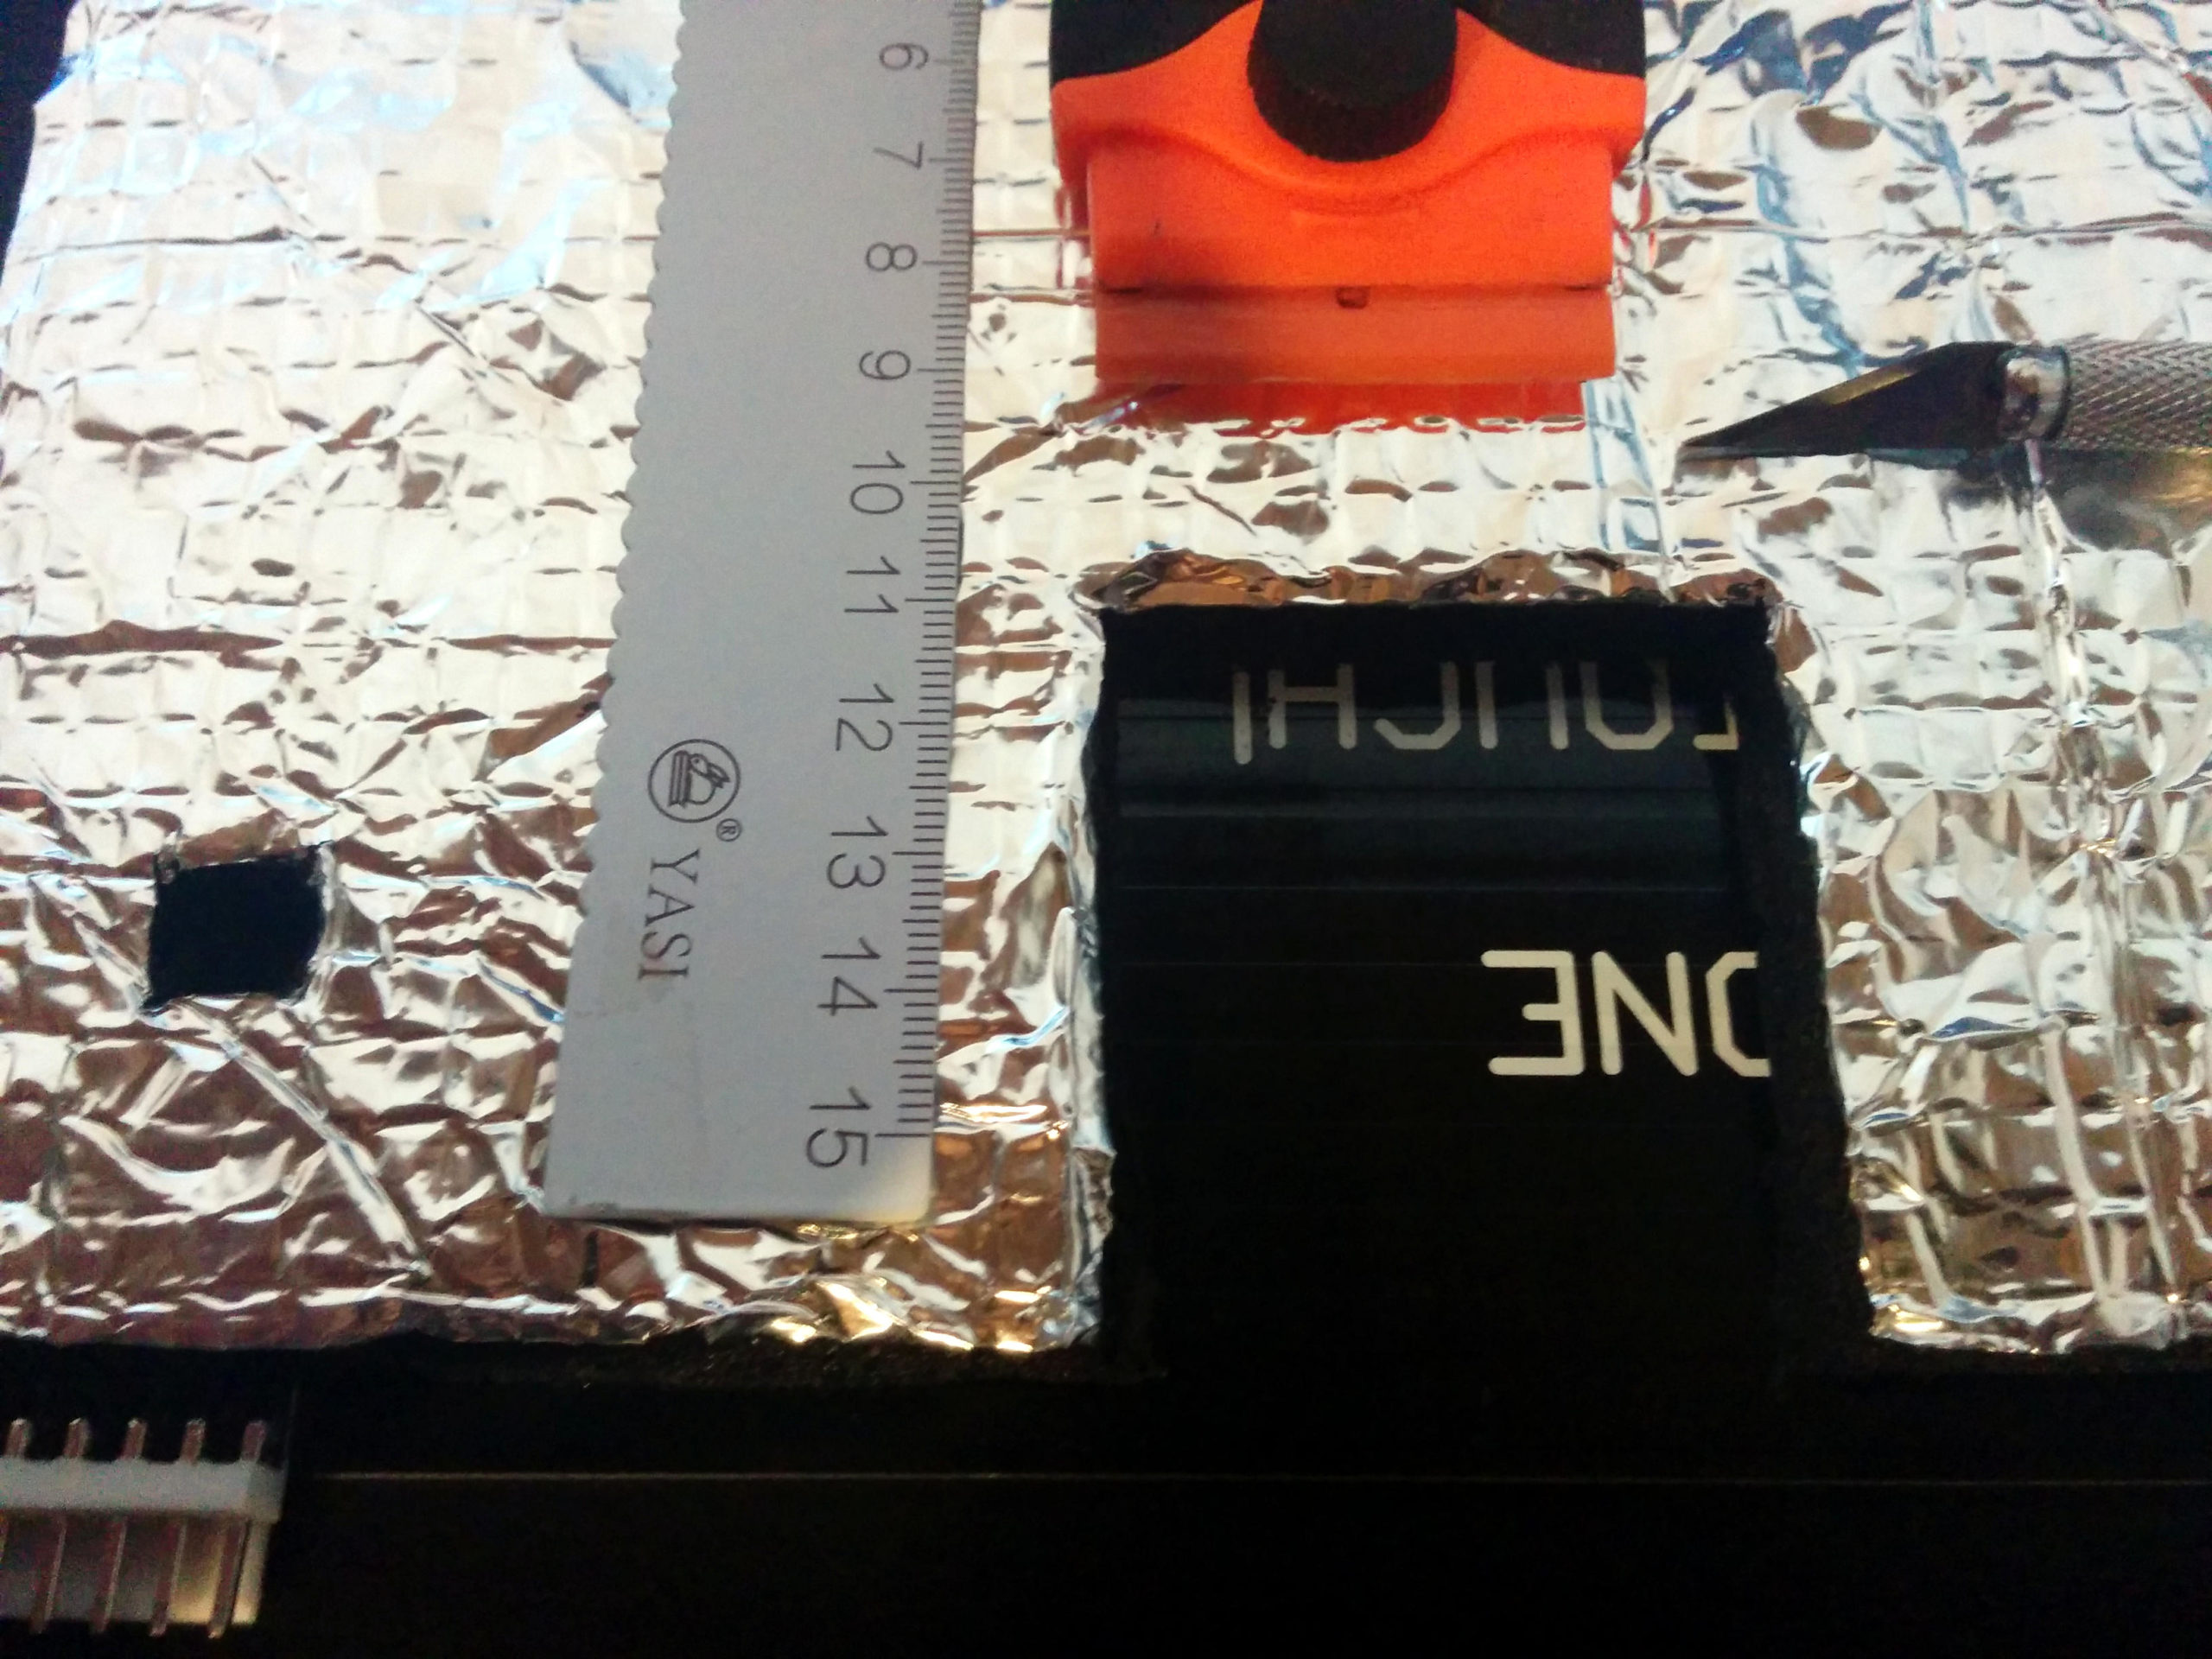
In the following photo, we can see the point of impact, but with the naked eye the marks were much more visible. There had already been marks (that you can barely make out) when you upgraded. I did not realize it at the time, but they helped me to identify the width and the length that my cut should have.

Problème de moteur

I carefully cut the reflective part (probably aluminum) very straight, taking care not to descend with the exacto lower than necessary. Then I got down on the foam, without touching the bottom surface of the tray. I ended up scraping the remaining foam with the nail, then with my plastic blade scraper. I finished with acetone on a paper towel.

Découpe moteur

I was finally able to reassemble the heating bed, clean it with acetone as long as I had it on hand (fingerprints can be very corrosive over time), reassemble the glass plate, redo a leveling, and check with homing that the engine was running well. I ended the session by measuring the heating times in the table above.

Products and tools used

This insulating foam for 3D printer heating bed exists in 22 cm and 30 cm. It is slightly smaller than the bed’s plate, which leaves space for the clamps and the power connector. I bought the 30cm model for my Alfawise U20 in June 2020.

The Wolfcarft Microfix pliers were used to hold the foam on the bed before gluing. Having not bought them from Amazon, I do not have the date of purchase, but I would say between 2008 and 2010. They serve me in all types of work and I am very happy.

This exacto-knife is supplied with 3 handles and 13 different blades in a very solid box. The box also contains a small cutting board, which probably made me buy this product rather than another. I bought it in January 2020, and I use it very often to make cardboard models of furniture or for the finishes of my parts printed in PLA. I can no longer find the product sheet, but I also bought a box of 120 spare blades, which is small enough to fit inside the box of the exacto-knife. All foam cuts were made with this tool.

This metal ruler / protractor / square set never leaves my exacto-knife. They are very small, supplied in a handy plastic box to store. I bought them in February 2020 and mainly use them to make cardboard models of furniture. They allowed me to make a straight cut for the passage of the Y axis motor.

In 2018 I bought this scraper for ceramic hobs. I use it every winter to clean the glass of my fireplace insert, but it also has plastic blades, which I used here to clean the part of foam that I had to remove to free up space for the engine Y-axis.

Argon one, the ultimate case?

The Argon one case from Argon Fourty is extremely promising. Here are my first impressions of the unpacking and installation of the Raspberry pi 4 version of this case.

At first glance, this case is magnificent. That said, it’s subjective, everyone has their tastes. It is an aluminum housing with passive and active heat dissipation. It moves all of the Raspberry Pi’s side sockets at the back of the case, which I was looking for from the old Media Pi case that I still have in its box. It also manages an active power button, and has an infrared option, not supplied as standard. That said, someone who is a bit of a DIY enthusiast can easily add it.

The box contains:

  • The installation manual, in English, but very well illustrated;
  • The upper shell;
  • The lower shell;
  • The offset of lateral connections in an antistatic bag;
  • The accessories (screws, thermal pads, feet) in a second bag.

To see beautiful photos taken in the studio, here is the manufacturer’s product sheet: Argon ONE Pi 4 Raspberry Pi Case.

This case consists of two shells. The upper aluminum shell allows passive heat dissipation thanks to two guides that go down to the chips and two self-adhesive thermal pads (supplied) that you will need to install. It also manages active dissipation by exhausting air from the fan. A magnetic hatch on the top gives access to the deported GPIO while serving as air exhaust. The network plug in a bit tight and difficult to insert. A file stroke would not be luxury.

The lower semi-transparent plastic shell allows you to view through the LEDs of the Raspberry pi 4 and infrared LEDs if you install them. I will come back in a future article to this option which I like.

It is supplied with 2 circuits. One, already installed in the metal shell, manages the power button, the fan, the GPIO remote, and the optional infrared port. The other, to install yourself, manages the offset of the side sockets at the rear of the box.

We see everywhere on the Internet people who complain that their Raspberry Pi does not start. So here I remind you how important it is to use an official power supply, or at least expressly provided to power a Raspberry Pi, and not just any phone charger. Charging a battery is not at all the same as powering a computer, so charger manufacturers do not have the same specifications.

The software installation of the box is just as simple. A script, shown in the manual, installs the fan and power button support. To date, I have only tested the installation under Raspbian, but on the blog part of the official site (which I gave you the address above) you will find articles on its specific installation under OSMC, RecalBox, LibreElec, and maybe even others since.

Regarding heat dissipation, I have not managed to exceed 35 ° C in several hours of operation. So I cannot say if the fan works or is silent, so the passive dissipation is already effective. I would push it a little more in the next article on the subject.

In conclusion, I find this case beautiful, well thought out, effective. It will most certainly take the place of my emulator. Probably also from my multi-media player (LibreElec) if it is compatible with my ambient lights. And I also plan to make a second workstation based on a Raspberry Pi, which will use this case. There is still research to be done and things to be said about it, which will lead to at least one other article.

Layers heights

In 3D printing, as in many other fields, you can choose between different qualities of work ranging from draft quality to fine quality. As far as we are concerned, the concept of quality concerns the layer height. It will not affect our resolutions on the X axis or on the Y axis, but only on the Z axis (vertical).

To illustrate this article, I printed the same object, a Storm Trooper helmet, in three different resolutions:

Layer height

At 0.1 mm per layer, the first impression on the left. The estimated printing time was 3:42 (4:45 after actually heating). The amount of filament expected was 19 g, or 6.43 m.

At 0.2 mm per layer, the impression of the medium. The estimated printing time was 1h50 (2h21 after actually heating). The amount of filament expected was 19 g, or 6.35 m.

At 0.3 mm per layer, the rightmost impression. The estimated printing time was 1h15 (1h35 after actually heating). The amount of filament expected was 19 g, or 6.43 m.

Note that the quality has a great impact on the printing time. It turns out that this is exactly what we are asking. On the other hand, it hardly affects the quantity of matter. The little change that quality applies to the geometry of the part will eventually alter the way your slicer will generate its supports. This is the small difference in filament length that we see here on printing in 0.2 mm per layer.

The differences in quality will be much more visible on parts with organic shapes, like here. And less on technical forms, rich in flat surfaces. This is the reason why I chose an object with organic forms. The top of the helmet being the very example.

On the rightmost impression, with the eye, we even see that the printer has not managed to close the entire helmet. There are gaps between certain layers.

Note that the layer height must not exceed 80% of the nozzle diameter. With a 0.4 mm diameter nozzle, this gives a maximum height of 0.32 mm. That said, you can exchange your nozzle for a larger diameter. More information on the (french) article Tout sur les buses de diamètre différent, from the Filament-ABS website.

Take care of your spools

I have been printing in 3D for a few years now, and I am taking advantage of the arrival of new coils during this period of de-containment to tell you about the measures I use to preserve them as best as possible.

When you receive a new spool of printing filament, the filament of this spool must be aligned (no thread passes over another), ideally distributed (each layer forms a straight line, perpendicular to the discs of the spool), under vacuum (or at worst, in a waterproof bag), and with a desiccant sachet.

The first two points show that your manufacturer has used a professional winder, which manages the filament correctly during winding. The next two show that he has common sense, that he respects his customers, and wants his product to be kept in good condition.

Vacuum packaging is the best to guarantee the long conservation of the filament before its sale. But the resealable bag (freezer bag style) is the best way to store it at home, after purchase. Still accompanied by its desiccant sachet.

I specify here that I only print in PLA. These measures should apply to other materials, but do not hesitate to correct me or complete me if I forget things that would only concern ABS, PETG, PA, etc. You can push the subject by reading Etude de la conservation des filaments pour impression 3D (in french) from Maker Shop.

When I receive a spool, was I saying, I start by neatly cutting out its vacuum bag, which I carefully store with its desiccant bag. I install the spool and print a staple. If it is a new filament, I also print a medallion so that I always have a sample at hand with the brand and the model. Finally if its packaging is neutral, I print a second medallion that I stick on the box with double-sided adhesive.

Medallion and staple  Filament boxes

When I store a filament, I carefully remove the filament, preventing the spool from relaxing. I cut it at 45 ° above the bead created by the heater to facilitate insertion the next time. I cleanly rewind what was unwound and staple it inside one of the discs of the reel, as taut as possible. I put the spool in the plastic bag that contains the desiccant sachet. I put everything in the box, which I store vertically.

When I get rid of an empty spool, in addition to ensuring which waste goes to which reprocessing subsidiary, I keep a few plastic bags with their desiccant sachet in case I test a manufacturer that does not do things in the standards, allowing me to pack a new coil more cleanly. I do the same with a few boxes of neutral packaging.