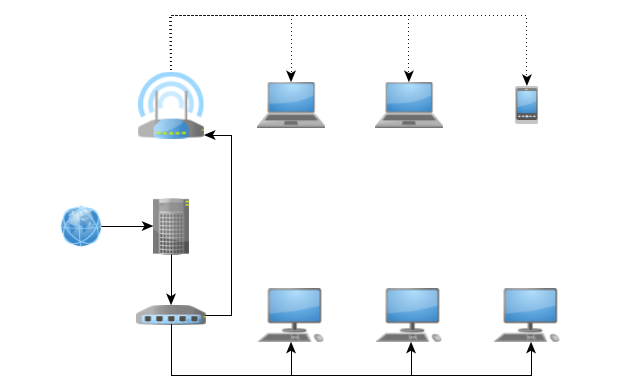
In the series of WiFi access points, we will see the bridged WiFi access point (or Dumb AP), which allows to add WiFi connectivity to an existing network, with no other new services than negotiation and authentication. It uses existing infrastructure services.
The network bridge
The network bridge is a low-level means (layer 2 of the OSI model) to connect network segments, usually of different technologies. We will use it here to connect an Ethernet segment to a WiFi segment. We will need the bridge-utils package:
$ sudo apt-get install bridge-utils
We will start by separating the different interfaces into different configuration files using the mechanism of /etc/network/interfaces.d/. The first will contain the loopback interface and the inclusion of others:
# interfaces(5) file used by ifup(8) and ifdown(8)

# Please note that this file is written to be used with dhcpcd
# For static IP, consult /etc/dhcpcd.conf and 'man dhcpcd.conf'

allow-auto lo
iface lo inet loopback

# Include files from /etc/network/interfaces.d:
source-directory /etc/network/interfaces.d
As suggested in the comments, it may be useful to consult the man pages interfaces (5), ifup (8), and ifdown (8).
The Ethernet interface:
# interfaces(5) file used by ifup(8) and ifdown(8)

allow-hotplug eth0
iface eth0 inet dhcp
The WiFi interface:
# interfaces(5) file used by ifup(8) and ifdown(8)

allow-hotplug wlan0
iface wlan0 inet manual
And the network bridge:
# interfaces(5) file used by ifup(8) and ifdown(8)

allow-auto br0
iface br0 inet dhcp
        bridge_fd 1
        bridge_hello 3
        bridge_maxage 10
        bridge_stp off
        bridge_ports eth0 wlan0
Here we will set our access point in DHCP, but we can definitely set it in static if we wish.
As shown in line 9, the bridge connects eth0 (Ethernet) and wlan0 (WiFi) interfaces.
It is still necessary to restart the network stack. If you are connected in SSH on the access point and it is set as DHCP, the communication should cut a few seconds then reuse the previous lease and restore the connection:
$ sudo service networking restart
You should now have 4 interfaces :
$ ip addr show
1: lo: <LOOPBACK,UP,LOWER_UP> mtu 65536 qdisc noqueue state UNKNOWN group default
    link/loopback 00:00:00:00:00:00 brd 00:00:00:00:00:00
    inet 127.0.0.1/8 scope host lo
       valid_lft forever preferred_lft forever
    inet6 ::1/128 scope host
       valid_lft forever preferred_lft forever
2: eth0: <BROADCAST,MULTICAST,UP,LOWER_UP> mtu 1500 qdisc pfifo_fast master br0 state UP group default qlen 1000
    link/ether b8:27:eb:f3:f5:23 brd ff:ff:ff:ff:ff:ff
    inet 192.168.2.14/24 brd 192.168.2.255 scope global eth0
       valid_lft forever preferred_lft forever
3: wlan0: <NO-CARRIER,BROADCAST,MULTICAST,UP> mtu 1500 qdisc mq state DOWN group default qlen 1000
    link/ether e8:4e:06:19:47:ee brd ff:ff:ff:ff:ff:ff
4: br0: <BROADCAST,MULTICAST,UP,LOWER_UP> mtu 1500 qdisc noqueue state UP group default
    link/ether b8:27:eb:f3:f5:23 brd ff:ff:ff:ff:ff:ff
    inet 192.168.2.14/24 brd 192.168.2.255 scope global br0
       valid_lft forever preferred_lft forever
    inet6 ****:****:****:****:****:****/64 scope link
       valid_lft forever preferred_lft forever
Hostapd
Hostapd is the daemon that will manage the WiFi access point and authentication. It is installed from the repository:
$ sudo apt-get install hostapd hostap-utils
If there is no default configuration (and this was my case), the file /etc/default/hostapd tells us that we can find one in /usr/share/doc/hostapd/examples/hostapd.conf.gz. As often, this file is rather well documented. So we will start from it:
$ sudo cp /usr/share/doc/hostapd/examples/hostapd.conf.gz /etc/hostapd/
$ sudo gunzip /etc/hostapd/hostapd.conf.gz
In case of problem, we can still start again from the original file.
In the launcher (/etc/init.d/hostapd), we will enter the path of the configuration file (/etc/hostapd/hostapd.conf) in the DAEMON_CONF variable.
In its configuration (/etc/hostapd/hostapd.conf) we will create a basic WiFi access point, but secure anyway. To make it shorter, I will ignore the comment lines here (thanks to the grep "^ [^ #]" /etc/hostapd/hostapd.conf command), and I will even show you only the lines that have changed compared to default values:
interface=wlan0
bridge=br0
ssid=NomDuReseau
channel=7
wpa=2
wpa_passphrase=MotDePasse
wpa_key_mgmt=WPA-PSK
wpa_pairwise=CCMP
rsn_pairwise=CCMP
- The interface must match the one we saw above. Most often it will be wlan0.
- The SSID is the name under which the access point will be seen
- The channels are numbered from 1 to 14. We will place ourselves in the middle.
- The other lines set WPA2 security.
Finally, we will enable the transit of packets across the bridge:
$ sudo sysctl -w net.ipv4.ip_forward=1
To persist this configuration to disk in order to find it after reboot, it must be uncommented in /etc/sysctl.conf:
(...)
# Uncomment the next line to enable packet forwarding for IPv4
net.ipv4.ip_forward=1
(...)
For more information, see the sysctl.conf (5) man page.
Apart from the Hostapd part, which is specific to WiFi networks, this configuration can also be used as is to connect two Ethernet segments, an Ethernet segment and a fiber segment, and so on.
The difference with a routed access point lies in the fact that the packets pass directly from one interface to another, without being altered, which makes it possible to extend the network without creating a new one. All IP parameters (mask, gateway, broadcast, etc.) remain unchanged, except for the address, of course.
Return to WiFi access points.
One comment
Comments are closed.